
If you’re just getting into woodworking or carpentry, learning how to use a speed square is one of the fastest ways to improve your accuracy, speed, and confidence. This compact triangular tool can mark square and 45-degree cuts, scribe parallel lines, set saw bevels, and even lay out rafters and stair stringers. In this beginners’ guide to how to use a speed square, you’ll learn the features, core techniques, and pro tips that make it an everyday essential.
For step-by-step project plans you can practice with as you learn, check out TedsWoodworking for a huge library of beginner-friendly builds.
Table of Contents
Understanding the tool: parts, features, and types
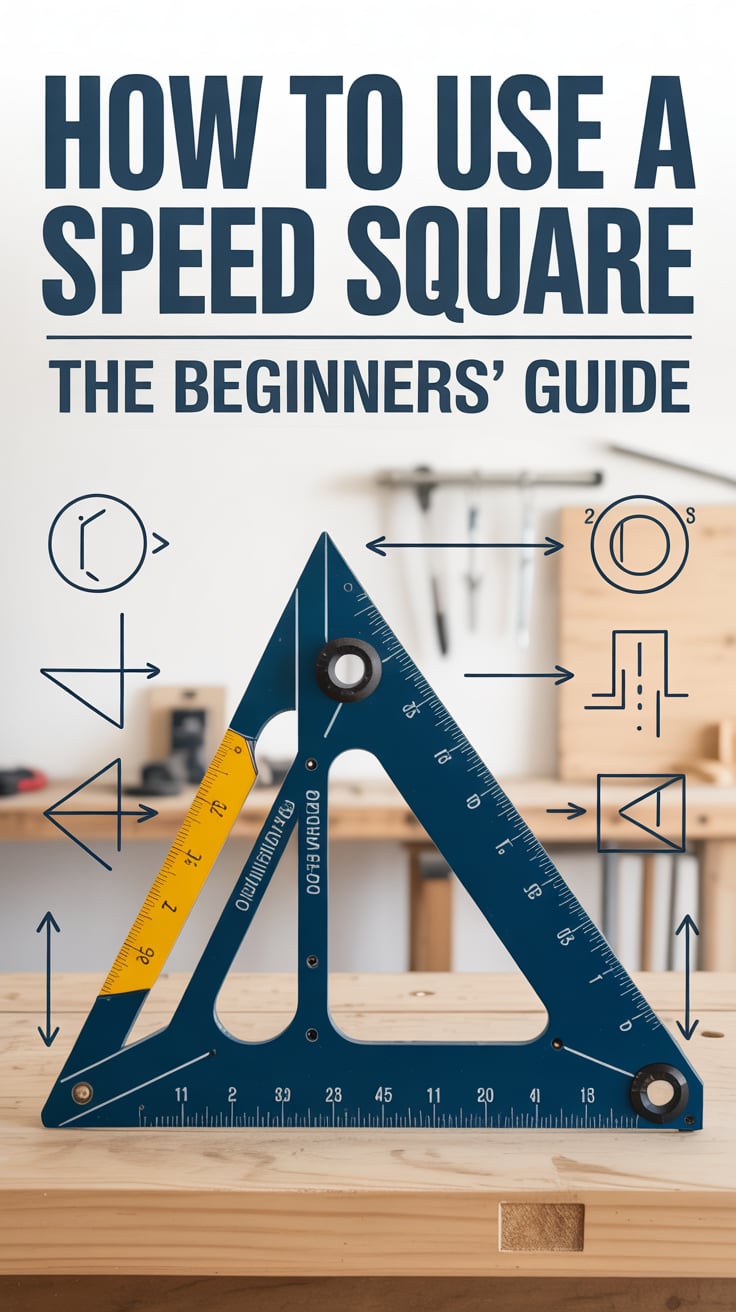
A speed square (also called a rafter square) is a right triangle made for quick layout. Most have a thick lip (fence) along one edge that hooks onto the edge of a board, keeping the square from slipping while you mark.
Key features you’ll see on most speed squares:
- Fence: The thicker, raised edge that rides against the workpiece. It’s the foundation for square, repeatable marks.
- 90° reference edge: One short leg of the triangle forms a perfect 90-degree reference when the fence is against your stock.
- 45° hypotenuse: The long edge is set at 45 degrees, letting you mark and check miters instantly.
- Scribe notches: Small, evenly spaced notches parallel to the fence that let you scribe parallel lines quickly—just drop a pencil in the notch and slide the square.
- Degree/protractor scale: A rotating reference using the “pivot” corner lets you lay out angles other than 45° by aligning a degree mark with the board edge.
- Rafter scales: Scales labeled “Common,” “Hip/Val,” or “Degrees” are used to lay out roof rafters and other framing tasks.
- Cut-out/diamond marks: Many squares include a diamond or special mark often used as a quick reference for common framing dimensions.
Common sizes and materials:
- 7-inch speed square: The most popular size, ideal for 1x and 2x lumber, trim work, and jobsite carry.
- 12-inch speed square: Great for wider boards, framing, and when you want a longer saw guide.
- Materials: Aluminum and steel are durable and reliable; plastic squares are lightweight and inexpensive, but verify they’re true and avoid heat warping.
How to check if your speed square is true:
- Place the square against a factory edge on a sheet of plywood. Draw a line along the 90° edge. Flip the square over and align the 90° edge with your line. If the edge matches your line exactly, it’s square. If it creates a V or divergence, the square is out of true and should be replaced.
Safety note: When using your square as a saw guide or in any cutting operation, wear eye protection and keep hands a safe distance from the blade. See OSHA’s guidance on Eye and Face Protection.
For a quick refresher on standard square markings, review the manufacturer references such as the Swanson Tool Co. – Speed Square Reference Guide.
Core layout moves every beginner should master
- Square 90-degree marks
- Hook the fence over the edge of your board. Hold the fence firmly against the board so it can’t slide.
- Draw a line along the 90° edge. This gives you a dead-square crosscut line in seconds.
- Use this to mark trim, crosscuts, and joinery—any time you need a perpendicular line.
- Quick 45-degree miters
- Flip the square to use the hypotenuse as your guide.
- With the fence against the board, draw along the 45° edge. It’s perfect for simple miters, corner braces, or chamfers.
- Accurate short measurements
- Most speed squares include inch scales. You can measure short distances directly on the tool to place holes, mark reveals, or space fasteners without swapping to a tape.
- Scribing parallel lines
- If your square has scribe notches, set your pencil in the notch for the offset you want (e.g., 3/8″, 1/2″, 3/4″).
- Keep the pencil seated in the notch as you slide the fence along the board’s edge, keeping steady pressure. This creates a crisp line parallel to the edge.
- Great for layout lines for rabbets, reveals, and setback lines for screws.
- Checking parts for square
- Place the fence on one edge of a board and rest the 90° edge on the adjacent face to see if a corner is square. Small gaps indicate out-of-square joints or cuts.
- Marking repetitive parts
- Use the square to quickly replicate lengths. After you set a stop on your miter saw or clamp a stop block at the workbench, use the square to transfer exact lengths, saving time across multiple pieces.
Tips for better lines:
- Use a sharp pencil (or a marking knife for ultra-precise joinery) and keep your eye directly above the mark to avoid parallax.
- In your workflow, learn to index the fence with your thumb while your other fingers pinch the board; this “pinch-and-pivot” hold speeds up layout and reduces slips.
If you’re new to reading fractional inches or switching between imperial and metric, to solidify fundamentals before you mark.
Using a speed square as a circular saw guide
A speed square doubles as a rock-solid fence for your circular saw, ensuring fast, square cuts with less measuring.
Set up for a square crosscut:
- Hook the speed square’s fence over the board’s near edge with the 90° edge aligned to your cut line.
- Place the saw’s shoe against the square’s long edge. Keep the saw shoe flat and flush against the square.
- With the saw blade just touching the waste side of the line, start the saw, let it reach full speed, then push forward steadily while maintaining contact between the saw shoe and the square.
- Keep both hands clear of the blade path; never “hug” the square near the blade.
Tips for repeatability:
- Mark a crisp, thin line and cut on the waste side.
- If you use the same saw regularly, note the distance from the saw blade to the shoe edge; this lets you place the square offset quickly when needed.
- For narrow pieces where the square can rock, clamp the square or use a 12-inch square for more bearing surface.
Using the 45° edge as a miter guide:
- Hook the fence, align the 45° hypotenuse to your line, and run the saw shoe along the hypotenuse. Cut slowly to maintain the angle.
Guiding a jigsaw or oscillating tool:
- A speed square can guide other tools too, but be mindful that jigsaw blades can wander; scribe with a knife first for cleaner edges.
Avoid these mistakes:
- Pushing the saw so hard that it lifts or slips off the square.
- Allowing dust buildup under the square or saw shoe, which introduces inaccuracies.
- Using a damaged square; a dinged fence or bent corner will cause cumulative errors.
Laying out precise angles with the protractor, miter, and bevel
The protractor function of a speed square is a game-changer for angles beyond 45 degrees. Here’s a reliable process:
Using the pivot and degree scale:
- Identify the pivot point (typically the pointed corner opposite the fence).
- Place the pivot at the edge of your board where you want the angle to originate.
- Rotate the square until the desired degree mark aligns with your board’s edge. Hold it steady.
- Draw your angle line along the long edge of the square. This delivers a precise angle without a separate protractor.
Transferring angles:
- Use the square to capture an existing angle on-site (like a wall that isn’t square). Place the pivot at the edge and rotate until both edges of the square align with the adjacent surfaces, then read the angle and transfer it to your workpiece.
- For bevel angles on a saw, set your saw’s bevel to match the square’s drawn angle or use the square to confirm the saw’s bevel setting.
Bevel and miter coordination:
- When making frames or trim with compound angles, mark your miter on the face using the square, then set your saw’s bevel accordingly. Your speed square helps double-check both parameters.
Scribing offsets for chamfers and tapers:
- To create a beveled edge or taper line, scribe parallel lines at measured offsets using the notches, then draw a diagonal to connect them. The square gives you consistent guides to plane or saw to the line.
Checking angle cuts:
- After cutting, place the square’s 45° or protractor reference to the cut to confirm the angle. If you’ll make many identical cuts, use your first perfect piece as a template and your square to verify as you go.
Practice drill:
- On scrap, lay out lines at 10°, 22.5°, 30°, 37°, 45°, and 60°. Cut or plane to these lines and verify with the square. This improves your intuition for sighting angles and controlling tools.
For further reading on jobsite techniques, see this practical overview from Family Handyman on using a speed square.
Roof framing essentials: pitch, rafters, hips, and valleys with a speed square
Roof work is where speed squares earned their fame. Understanding pitch and the rafter scales unlocks fast, accurate layout for common rafters, hips, and valleys.
Understanding roof pitch:
- Pitch describes the rise over a 12-inch run. For example, 4/12 means the roof rises 4 inches for every 12 inches of horizontal run.
- Your speed square’s “Common” scale corresponds to the pitch: set the square for the desired pitch to draw plumb and seat cuts on rafters.
Plumb and seat cuts (common rafters):
- Hook the square’s fence on the top edge of your rafter stock.
- Rotate the square until the “Common” scale aligns with your desired pitch number against the board edge (e.g., 6 for 6/12 pitch).
- Draw the plumb cut along the square’s edge.
- From the plumb line, use the square to mark the seat cut by sliding the square down and drawing a line perpendicular to the plumb line for the birdsmouth seat. The notch depth should not exceed code limits; leave adequate bearing material.
- Use any reference marks (like the diamond) as quick guides only if they match your required dimensions—always measure to verify.
Hips and valleys:
- Use the “Hip/Val” scale, which accounts for the longer run of hip/valley rafters. Mark plumb cuts using the corresponding pitch on this scale.
- Carefully transfer calculated offsets and allowances for ridge thickness, jack rafter spacing, and overhang.
Layout sequence tips:
- Start with a full-length rafter calculation, mark your plumb cut at the ridge, then measure down the top edge to the birdsmouth location, mark the seat and heel, and add overhang and tail cuts.
- Keep all marks on the same face for consistency. Use your square to repeat exactly across multiple rafters.
Verification and safety:
- Mock up one rafter and test-fit before cutting the full batch.
- Follow local code for notch depth and bearing surface and verify with your building department or references like Simpson Strong-Tie’s roof framing terms guide.
If you’re building a small outbuilding or lean-to, having printable plans simplifies the math while you focus on technique. For modular shed and roof layouts, see My Shed Plans for a collection of projects you can practice on as you master roof pitch markings.
For a deeper conceptual background on rafter layout, manufacturer references and carpentry textbooks are excellent companions to hands-on practice.
Stair and deck layout, cabinetry, and on-site carpentry tricks
A speed square isn’t only for roofs—it’s equally at home on stair stringers, deck layouts, and shop projects.
Stair stringers:
- Use your square with stair gauges (small clamp-on stops) to quickly mark rise and run repeatedly along a 2×12.
- Set the gauges to your calculated rise and run (e.g., 7-3/4″ rise, 10″ run). Clamp one gauge on the 90° edge for rise and the other on the 90° edge for run; place the square on your board so the gauges register on the edge.
- Mark the first step. Slide the square along so the gauges remain in contact and mark the next, and so on. Your speed square keeps each step identical.
- Remember to account for material thickness at the top and bottom and adhere to local code for tread depth and riser height.
Decking and exterior carpentry:
- Use the square to quickly align and mark balusters or spindle spacing. Its short, stiff body is ideal for compact spaces.
- Scribe parallel lines for consistent screw reveals on decking and cladding.
- Check post tops for square before installing caps.
Cabinetry and furniture:
- Keep a 7″ square at your bench for instantly squaring face frames, marking shelves, and checking carcass corners before glue-up.
- For plywood cabinets, the square is a reliable guide for marking shelf pin rows, hinge cup positions, and drawer slides when combined with a simple jig.
- When miters must meet perfectly—picture frames, trim returns—use the 45° edge for layout and as a test tool to catch gaps early.
Layout hacks you’ll use often:
- Tiny “X on the waste” marks: After you draw a line, mark the waste side with a small X. Your cuts stay consistent without second-guessing.
- Knife before pencil: For fine joinery, knife a shallow line with the square first, then darken with pencil if needed. A knife line guides saw teeth and reduces tear-out.
- Orient the fence: Use the fence as your anchor—always hook it to the same reference edge throughout a project for consistency.
Supplemental skills:
- Sharpen your understanding of tolerances by practicing “sneaking up” on a fit: mark with the square, cut slightly proud, and plane to the line.
- Pair your square with a sliding bevel gauge to lock unusual angles and transfer them to new parts.
Accuracy habits, care, and integrating the square into your shop workflow
Accuracy is more about habits than tools. Combine your speed square with smart routines and your results will jump immediately.
Daily habits for precision:
- Index your reference face: Pick one face and one edge of every workpiece as “reference.” Always hook your square’s fence to the reference edge when marking other faces. Consistency eliminates compounding errors.
- Stand the square up: Keep the fence firmly planted against the workpiece, not “floating.” A floating fence introduces slop.
- Mark, then verify: After you mark, re-seat the square and check that the line still aligns before you cut.
Care and maintenance:
- Protect the fence: Dings on the fence translate into skewed lines. Store the square on a peg or in a drawer slot where it won’t get knocked around.
- Clean it: Pitch and dust cling to the edges and notches. A quick wipe keeps it sliding smoothly and prevents grit from scratching your work.
- Re-check squareness: Do the flip-line test periodically, especially if the square takes a fall.
Workflow integration:
- Keep a small square at your bench and a larger one near your saw station. That “always within reach” habit minimizes measurement shortcuts that cause errors.
- Create a clip-on holster or add a dedicated spot to your apron. The less you set it down, the more you use it.
Shop setup and speed:
- Organize a “layout zone” with pencils, knife, eraser, tape measure, speed square, sliding bevel, and chalk. When these are co-located, your layout becomes a smooth sequence instead of a tool hunt.
- If you’re outfitting a tight shop, investing in multi-use tools (a speed square being a prime example) reduces clutter and cost. For complete, space-savvy shop setup plans and workflows, explore UltimateSmallShop – The Next Woodworking Blockbuster! for guidance on layout, essential tool picks, and budget-friendly strategies.
Practice projects to cement your skills:
- Cut and assemble a simple tool tote or birdhouse using only a circular saw and speed square.
- Build a pair of sawhorses—repetitive, square parts make great accuracy practice.
- Try a small mitered picture frame; perfect miters teach you to mark crisply and cut to the waste side.
When you’re ready to put roof pitch skills to use, consider a small shed or lean-to. Having structured plans keeps you focused on technique. Browse My Shed Plans for a range of beginner-friendly designs.
And as you progress, curating a plan library pays dividends. With thousands of printable projects, TedsWoodworking can keep you practicing real-world layouts from day one.
For additional background reading, see the concise overview from Family Handyman and manufacturer references like Swanson Tool Co..
Conclusion
Mastering how to use a speed square unlocks fast, reliable layout for everything from picture frames to rafters. Start with the essentials—90° and 45° lines, scribing parallels, and using your square as a saw guide—then grow into angle layout, roof pitch, and stair stringers. Build accuracy habits, keep your square in reach, and practice on simple projects to lock in muscle memory.
To keep learning while building useful projects, explore TedsWoodworking for a deep library of plans, and plan a small shed or lean-to where your roof-pitch skills shine with My Shed Plans. A compact, well-organized shop can also boost your results—UltimateSmallShop is a helpful resource for setting up smart workflows in limited space.
FAQ
How do I know if my speed square is accurate?
Draw a line with the square’s 90° edge on a factory-cut plywood edge, flip the square, and align to the line. If both edges match perfectly, it’s square. If a gap forms, the square is out of true.
What is the difference between a 7-inch and 12-inch speed square?
A 7″ square is compact and ideal for trim and 2x stock; a 12″ square offers a longer reference for wider boards and works better as a circular saw guide on larger stock. Many woodworkers keep both.
How do I use a speed square to find roof pitch?
Place the pivot on the rafter edge, rotate the square until the desired pitch on the “Common” scale aligns with the board edge (e.g., 6 for 6/12), and draw the plumb cut. Then slide the square to mark the seat cut. Always verify local code for notch depth.