
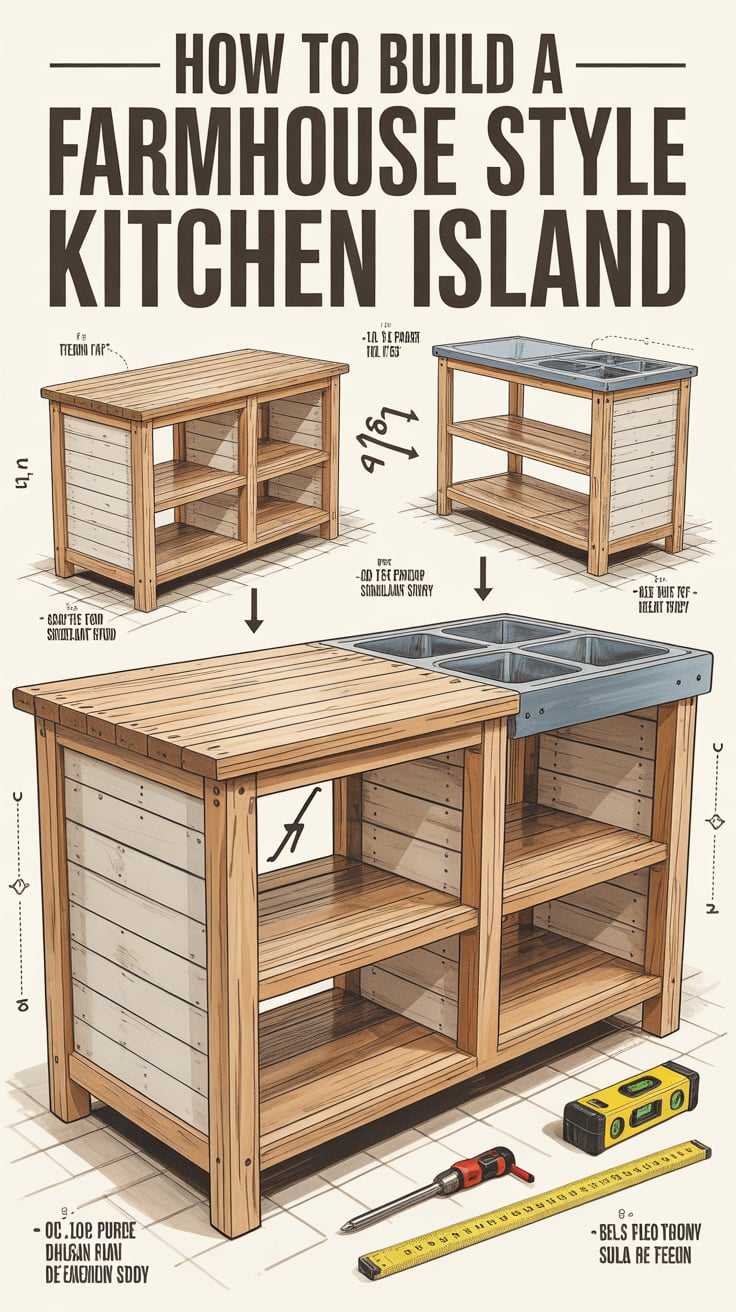
A farmhouse style kitchen island brings warmth, storage, and serious workspace to the heart of your home. Whether you’re after shiplap charm, an X-brace end panel, or a classic butcher block top, this step-by-step guide shows you how to build a farmhouse style kitchen island that fits your space and your budget. You’ll learn how to plan dimensions, choose materials, assemble a sturdy frame, add storage, clad the base with farmhouse details, and finish it so it stands up to daily kitchen life.
For printable plans and cut lists that pair perfectly with the steps below, grab the comprehensive plan library at TedsWoodworking.
Table of Contents
Planning layout, size, and features for a farmhouse island
Before you cut a single board, make a clear plan based on how you cook and gather in your kitchen. Farmhouse islands are as much about function as they are about style, and the right dimensions make the difference between “almost right” and “perfect fit.”
Start by mapping your floorplan. Tape the footprint of your island on the floor, then “test walk” normal kitchen tasks. Leave comfortable aisles around all sides—36 inches is a common minimum; 42–48 inches feels roomier. If the island faces a fridge, range, or dishwasher, make sure doors can open fully without bumping into the seating or the island itself.
Height and overhang:
- Standard counter height is about 36 inches; bar height is about 42 inches. Counter height typically works best for prep and for standard counter stools.
- If you plan seating, allow 12 inches of overhang for knee clearance on a wood top, and space stools 24 inches on center.
Footprint and workflow:
- A compact island might be 24 by 48 inches; a larger family island may run 30 by 72 inches or more. Scale the top to your room and consider overhangs on one or two sides for seating.
- Keep the work triangle in mind. Your island can serve as a prep zone between sink and range, a baking station, or a coffee bar. Build storage around what you’ll do most.
Farmhouse style choices to decide upfront:
- End panels with shiplap or beadboard, X-brace details, or simple frame-and-panel.
- Open shelves vs. doors/drawers; trash pull-out; towel bar or hooks; a low-profile furniture-style toe kick.
- Countertop material: butcher block (classic), solid wood planks, or a furniture-grade plywood base with a hardwood edge band. If you’re considering heavy stone, plan extra support in the frame.
Pro tip: Make a simple elevation sketch and label each surface. From there, you can generate a cut list and hardware list. If you’d like pre-drawn options in multiple sizes, the plan bundles at TedsWoodworking include farmhouse-style islands with shiplap and X-brace variants.
Tools, materials, and cost-savvy choices
Invest where it counts: a flat, strong frame, reliable slides and hinges, and a durable topcoat. You can dress the exterior with budget-friendly trim and paint to nail the farmhouse look without overspending.
Core materials:
- Framing and legs: 2×3 or 2×4 construction lumber (choose the straightest boards) or laminated poplar for furniture-style legs.
- Panels and shelves: 3/4-inch cabinet-grade plywood (birch, maple, or poplar veneer). See APA’s guidance on plywood types and grades: APA – Plywood Basics.
- Face frames, trim, and cladding: 1×2 and 1×3 poplar or pine for face frames; 1×6 tongue-and-groove for shiplap or beadboard panels; 1×4 for X-brace overlays.
- Countertop: butcher block in maple, oak, birch, or acacia. Harder species resist dents better (see the Janka scale at Hardwood Distributors Association: Hardness of Wood).
Hardware and fasteners:
- Pocket hole screws (1-1/4 and 2-1/2 inches), wood glue, 1-1/4-inch brad nails.
- 18-inch or 22-inch full-extension drawer slides (soft-close optional), European-style hinges for doors.
- Figure-8 fasteners or Z-clips for attaching a solid wood top while allowing for seasonal movement.
- Corner braces, L-brackets, and corbels for added overhang support if seating is planned.
Tools:
- Circular saw or table saw; miter saw; drill/driver; pocket hole jig; random orbital sander; brad nailer; chisels; square, tape, and clamps.
- Optional but helpful: track saw for straight rips; router for edge profiles; jig for installing slides.
Finishes:
- Primer (stain-blocking for pine), paint (milk paint or enamel), or stain; topcoat like waterborne polyurethane for durability. If prepping food directly on the top, use a food-contact-safe oil/wax on the butcher block and keep film finishes off the cutting surface.
Safety first:
- Protect your lungs from wood dust and finish fumes. See NIOSH guidance on wood dust exposure: NIOSH Wood Dust, and EPA notes on VOCs and indoor air: EPA on VOCs.
Helpful plans and shop setup resources:
- For step-by-step drawings, optimized cut lists, and joinery diagrams for farmhouse islands, see TedsWoodworking.
- Small workspace? Set up a safe, efficient shop in tight quarters with UltimateSmallShop – The Next Woodworking Blockbuster!. Smart layouts and tool picks save hours on a build like this.
Building the frame and legs for strength and stability
A sturdy frame is the backbone of your farmhouse style kitchen island. Even with shiplap and trim, the unseen structure carries the load of a heavy top and daily use. Build a rectangular “table” first, then enclose it.
- Mill and prepare legs
- Option A: Use 3-1/2 x 3-1/2 inch turned legs or make square legs by laminating 2x stock, then plane/sand flush. A 3-inch finished leg looks substantial and farmhouse-appropriate.
- Option B: Make boxed legs by wrapping 2×4 posts in 1x boards for a furniture-like look.
Height target: 34-1/2 inches for the base if your top is 1-1/2 inches thick, yielding a 36-inch finished height.
- Construct upper and lower rails (aprons)
- Rip 2x stock to 3 inches wide (or use 1×3 hardwood). Cut to length for the long and short sides, accounting for leg thickness and total footprint.
- Join aprons to legs using pocket holes hidden on the inside faces, glue, and clamps. Check for square. The upper apron sits flush with the top of the legs; the lower apron can sit 4–6 inches off the floor to leave room for a shelf or a furniture-style foot.
- Add stretchers and shelf support
- Add front-to-back stretchers aligned with where shelves or cabinet bays will go. Use 3/4-inch plywood cleats or 1×2 supports for shelves.
- If adding an open lower shelf, create a frame that supports 3/4-inch planks or plywood with a nosed edge. Pre-finish the shelf boards for easier finishing later.
- Check racking resistance
- Install a temporary diagonal brace or the first sheet of 3/4-inch plywood on the back to keep the frame square. Pocket holes and glue at every joint, and verify diagonal measurements match.
- Seat overhang supports now if needed
- If your island will have a seating overhang on one side, plan corbel locations and install blocking inside the frame where the corbel screws will anchor later.
Pro tip: Dry-fit the top on your frame once the aprons and legs are assembled. This helps verify the seating overhang and confirms your base is flat. For a downloadable diagram of apron offsets and stretcher placement, see the farmhouse island plans in TedsWoodworking.
Shelves, cabinets, and drawers that maximize storage
With the main frame square, it’s time to add functional storage. Farmhouse islands often mix open shelves for baskets with enclosed cabinets or drawers that hide clutter.
Layout your bays
- Divide the length of your island into storage zones: open shelf on one end, a central double-door cabinet, and a bank of drawers on the opposite end.
- Use 3/4-inch plywood to build cabinet boxes that fit snugly inside the frame. Screw through the frames’ aprons and stretchers into the cabinet carcasses to lock everything together.
Drawers
- Drawer boxes: 1/2-inch plywood for sides, 1/4-inch for bottoms slid into grooves or glued and stapled on the underside. A common depth is 18–22 inches. Height varies by need—shallow for utensils, deeper for linens.
- Slides: Install full-extension slides per manufacturer’s setback, typically requiring 1/2-inch clearance on each side. Shim as needed to keep slides parallel.
- Fronts: For farmhouse charm, use shaker-style fronts made with a 3/4-inch panel and 2-1/4-inch rails/stiles. Inset fronts look classic but require precise reveals; overlay fronts are more forgiving.
Doors
- Face frame: Build a 1×2 poplar face frame to cover plywood edges and define door openings. Pocket hole it together and glue to the cabinet carcasses.
- Doors: Simple shaker doors with 1×3 rails/stiles and a 1/4-inch panel work well. Hang with soft-close concealed hinges. Align the reveals using playing cards as spacers while adjusting hinges.
Open shelves
- Plank shelves: 1x boards gapped slightly to enhance the farmhouse vibe, or use a plywood shelf with a solid-wood nosing.
- Support: Biscuit or pocket-screw a 1×2 ledger on the inside of legs and aprons. Consider a center support if the span exceeds 36 inches.
Special inserts
- Trash/recycling pull-out: Dedicate a 15-inch-wide bay with a heavy-duty slide-out.
- Baking station: Add a slide-out cutting board or a mixer lift if you bake often.
Keep everything flush with the outer plane of the legs and aprons; your cladding and trim will wrap these internal boxes for a seamless exterior. If your shop is tight or you’re working off a small bench, the modular approach in UltimateSmallShop – The Next Woodworking Blockbuster! helps you stage assembly in limited space safely and efficiently.
Farmhouse cladding, trim, and character details
This is where your island gets its signature farmhouse style. Use simple, repeatable trim details and rustic-friendly materials to create texture and dimension.
Shiplap or beadboard
- Cut 1×6 tongue-and-groove boards, MDF shiplap, or beadboard panels to fit the side and back faces. Dry-fit pieces and mark stud/apron locations for nailer lines.
- Leave a business-card gap between shiplap boards to imply shadow lines, even if the boards are tight. Nail with 18-gauge brads into the aprons and internal cabinet sides.
X-brace end panels
- Build a simple picture frame on the island’s ends using 1x3s. Measure diagonally to fit an X from 1×4 ripped to 3 inches. Cut the center, then miter and fit the two remaining arms. Glue and pin-nail the X into the frame for the iconic farmhouse look.
- For a subtler style, use a flat center panel with applied molding.
Base molding and furniture feet
- Create a recess for a furniture-style toe kick by setting a 1×4 base back 2 inches from the legs, then add a simple baseboard or bullnose shoe around the perimeter.
- Add “feet” by trimming small blocks and placing them flush with each leg bottom, then wrapping the recessed base behind them.
Corner posts and top trim
- Soften edges with a 1/8-inch roundover using a router. Add 1×2 cap molding around the top of the base to visually separate it from the countertop.
- Corbels under a seating overhang deliver both support and style. Align them with internal blocking and fasten with structural screws.
Hardware and accents
- Cup pulls and latching knobs look right at home on a farmhouse island. A towel bar on the working end and a few iron hooks for aprons or oven mitts add practical charm.
- Consider wire baskets on open shelves for produce and linens.
Before you paint or stain, fill nail holes, caulk trim joints sparingly, and sand to 150–180 grit. Wipe dust carefully—especially on shiplap grooves. Need help choosing paint or stain colors that complement your cabinets.
Countertop installation, overhangs, and food-safe finishing
A butcher block top is the farmhouse staple—warm to the touch, forgiving on glassware, and easy to refresh. Install it so it can move seasonally and choose a finish that matches how you use it.
Sizing and support
- Cut the top to final size with clean rips and crosscuts. A typical overhang of 1 inch on non-seating sides looks proportional; allow 10–12 inches on the seating side.
- Overhangs beyond 12 inches benefit from support. Use 8–12-inch-deep corbels every 18–24 inches or add hidden steel brackets. Fasten into solid blocking in the frame.
Wood movement matters
- Never screw a solid wood top firmly across the grain. Use figure-8 fasteners or Z-clips in elongated slots so the top can expand/contract without splitting.
- Place fasteners around the perimeter and at stretchers, with spacing every 8–12 inches.
Edge profiles and protection
- Add a 1/8–1/4-inch roundover or small chamfer to soften edges and reduce chipping.
- If the island will host frequent prep, dedicate a zone or an end-grain cutting board. Keep film-forming finishes off cutting surfaces; use a penetrating oil/wax there.
Finishing options
- Food-contact-safe oil/wax (mineral oil + wax blends) for cutting areas. Reapply frequently at first, then seasonally.
- For non-cutting tops, consider waterborne polyurethane, wiping varnish, or hardwax oil. Waterborne polys keep color light and resist kitchen wear well.
- Keep VOCs low by choosing waterborne finishes or finishing outdoors/with ventilation. See EPA notes on VOCs.
Installing the top
- Dry-fit the top and align overhangs. Mark fastener positions from below. Pre-drill slots or install Z-clip hardware on the aprons.
- Set the top, center it, then drive screws through the movement hardware. Check alignment and shim corbels if necessary.
If you’re thinking about a stone or quartz top, beef up the frame, add a full 3/4-inch plywood subtop, and consult your fabricator for required support. For butcher block maintenance tips.
Painting, staining, and finishing that lasts
The farmhouse base often shines in a painted finish with subtle aging or a clean, satin sheen. Choose a finish that fits your kitchen’s wear-and-tear level.
Prep for success
- Sand everything to 150–180 grit. Break edges lightly. Vacuum and tack-cloth dust from shiplap grooves and trim details.
- Spot-prime knots in pine with a shellac-based primer; then prime the full base with a bonding primer to ensure even topcoats.
Painted finishes
- Classic route: two coats of enamel in a satin sheen. It’s durable and wipeable.
- Farmhouse patina: milk paint or chalk paint followed by a sealing topcoat. For gentle distressing, sand edges where natural wear would occur, then glaze lightly around trim for depth.
Stained finishes
- If you want the wood grain to show, stain face frames and cladding before final assembly to avoid white lines between boards. Wipe excess and allow to dry thoroughly before topcoat.
- Topcoat: waterborne polyurethane or hardwax oil provides protection. For a painted base, add a clear coat only if you need extra abrasion resistance at high-touch areas.
Hardware and final touches
- Install pulls and knobs consistently: measure and drill with a jig to keep alignment perfect. Cup pulls pair well with drawers; simple knobs suit doors.
- Add felt bumpers and soft-close hardware to reduce noise—great for open kitchens.
Safety reminder: Wear a respirator while sanding and when applying finishes, and follow dry-time guidance. For dust exposure and safe practices, see NIOSH’s overview: NIOSH Wood Dust.
If you’d rather follow a tested finishing schedule tailored to pine or poplar, you’ll find paint/stain recipes and step-by-step finishing guides bundled with the farmhouse plans in TedsWoodworking.
Styling, seating, and practical add-ons
A farmhouse island anchors the room visually and functionally. Round out your build with seating, lighting, and small upgrades that elevate everyday use.
Seating and comfort
- Choose stools that tuck fully under the overhang. Allow 24 inches of width per seat. Counter-height stools (24–26 inches high) match a 36-inch counter.
- Pad the underside of the overhang with a thin protective strip or edge band if you have delicate finishes; it helps prevent scuffs from stool backs.
Lighting and power
- Pendant lights centered over the island add task lighting and a focal point. Space two or three evenly, about 30–34 inches above the top.
- If you plan to add outlets or a built-in microwave, consult a licensed electrician and local codes. Plan wire runs before you close up the base.
Organization
- Mount a towel bar at the working end and add a paper towel holder under a seating overhang.
- Use wire or wicker baskets on open shelves for produce, linens, or pots.
- Inside drawers, add dividers for utensils and a shallow organizer for knives with blade guards.
Mobility and floors
- Consider locking casters if you want a movable island. If so, recess them behind a false foot to maintain the furniture look. Leveling feet are a good middle ground for older floors.
- Protect flooring with felt pads under fixed feet and ensure corbels never contact the floor when you lean on the overhang.
Maintenance
- Wipe spills promptly, especially on oil-finished tops. Refresh oil/wax as needed. Touch up scuffs on painted bases with a tiny foam brush.
- Re-tighten hardware once a year. Wood moves over seasons; a quick check keeps doors aligned and drawers gliding smoothly.
Quick resource recap
- Need measured drawings, cut lists, and a build sequence tailored to your tool set? Download farmhouse island plans in TedsWoodworking.
- Working in a small shop or garage? Optimize tool placement, dust collection, and work surfaces with UltimateSmallShop – The Next Woodworking Blockbuster!.
Ready to build your farmhouse style kitchen island?
You now have the blueprint to plan, frame, store, clad, and finish a handsome, hard-working island. Keep your dimensions comfortable, your frame stout, and your finishes practical, and you’ll have a centerpiece that ages gracefully with your kitchen. If you’d like printable plans, measured drawings, and cut lists to speed up the process, grab the farmhouse island plan set inside TedsWoodworking. For shop setup tips that make the build smoother, especially in tight spaces, check out UltimateSmallShop – The Next Woodworking Blockbuster!.
FAQ
How much does it cost to build a farmhouse style kitchen island?
Costs vary widely by size and materials. Budget builds with pine, plywood, and a DIY butcher block can be very affordable; premium hardwoods, soft-close hardware, and stone tops increase cost. Plan your materials list first to price accurately.
What size should a farmhouse kitchen island be?
Fit the island to your space. Leave at least 36 inches of aisle space around it. A small island might be 24 by 48 inches; larger kitchens can handle 30 by 72 inches or more. Height is typically 36 inches with a 1-1/2-inch-thick top.
Can I add seating to my island?
Yes. Plan a 10–12-inch overhang on the seating side and space stools 24 inches apart. Add corbels or hidden brackets for overhangs beyond 12 inches. Counter-height stools pair with a 36-inch island top.
How do I attach a butcher block top properly?
Use figure-8 fasteners or Z-clips so the top can expand and contract with humidity. Avoid screwing rigidly through the aprons. Support overhangs with corbels, and choose a food-safe oil/wax where you’ll cut.