
Rustic charm meets practical wildlife care with this simple log-cabin bird box. Below you’ll find free bird house plans, a clear cut list, and a step-by-step build that any DIYer can complete in a weekend. The design follows proven nest box guidelines for ventilation, drainage, and predator safety—perfect for wrens, chickadees, nuthatches, and bluebirds. Whether you’re brand new to woodworking or looking for a fun backyard project, this is a dependable, easy-to-clean bird house that lasts.
If you prefer printable templates and a larger variety of nest box designs, you can grab hundreds of ready-to-print plans in TedsWoodworking.
Table of Contents
Why a log-cabin bird box works and which birds it helps
A log-cabin bird house uses stacked “logs” (square dowels or strip wood) to create a sturdy, insulated shell that holds up to weather while keeping the interior dry and temperate. It’s forgiving for beginners, since the wall courses stack like building blocks, and it’s also highly customizable. You can change footprint size, hole diameter, and roof style to suit different cavity-nesting birds.
Guiding principles for any bird box:
- Right size and entrance hole for the target species
- Correct height and placement to attract birds while reducing predation
- Adequate ventilation and drainage to manage moisture and heat
- No interior perches and a roughened interior below the entrance for climbing
- Hinged access for annual clean-outs
Suitable species and hole sizes (general guidance):
- House wrens: 1 inch entrance, floor around 4×4 to 4.5×4.5 inches, 6–8 inches interior height
- Chickadees: 1 1/8 inch entrance, floor around 4.5×4.5 inches, 6–8 inches interior height
- Nuthatches: 1 1/4 inch entrance, floor around 5×5 inches, 8–10 inches interior height
- Eastern/Western bluebirds: 1 1/2 inch entrance, floor around 5×5 to 5.5×5.5 inches, 8–10 inches interior height
- Tree swallow: 1 1/2 inch entrance, floor around 5×5 inches, 8–10 inches interior height
Authority references for hole sizes and placement best practices:
- Cornell Lab of Ornithology’s NestWatch (nest box specs and placement)
- National Audubon Society (nest box building guidance)
- RSPB (UK) nestbox siting and safety tips
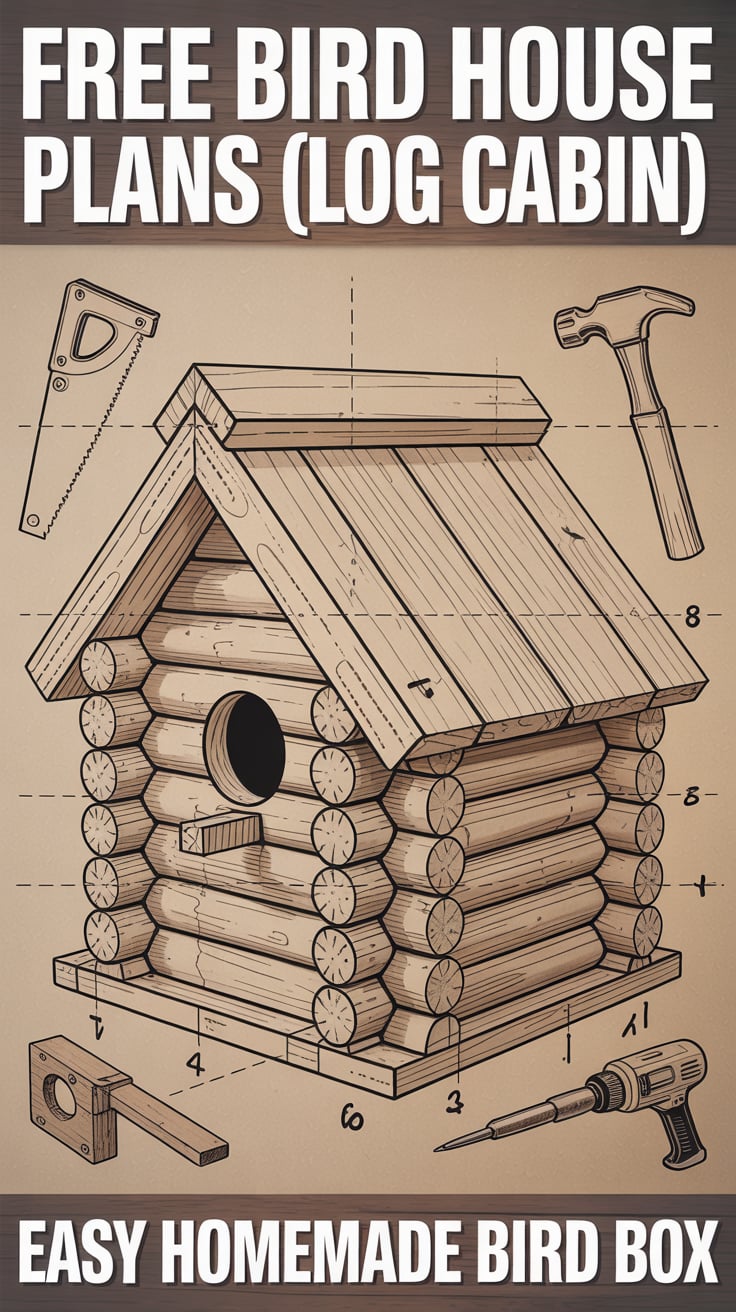
Your log-cabin bird box will use a 5×5 inch interior floor (6×6 inch outer base) and a 1 1/4–1 1/2 inch entrance to cover most common backyard cavity-nesters. Adjust as needed per species using the guidelines above and the external references near the end of this article.
Materials and tools for a durable cabin-style bird house
Choosing the right materials matters as much as the build itself. Natural, rot-resistant woods keep interiors dry and healthy, while the right fasteners and finishes ensure longevity without introducing toxins.
Recommended wood options:
- Western red cedar or white cedar: naturally rot-resistant, lightweight, weather-stable
- Cypress or redwood (if available): similar benefits, excellent for outdoor projects
- Pine or spruce: budget-friendly; seal edges and keep out of persistent dampness
- Avoid pressure-treated lumber for living spaces—chemicals can be harmful to birds
Lumber and “log” stock:
- “Logs”: 3/4 inch square cedar strips or ripped from 1× cedar/pine stock
- Base and roof: 3/4 inch cedar or pine boards
- Back panel: a solid board allows for easy mounting
Hardware and parts:
- Exterior wood glue (waterproof, Type II/III PVA)
- 1 1/4 inch exterior screws for structure, 3/4–1 inch brad nails or pins for logs
- Small brass or galvanized hinges (1–2) for hinged roof or side
- Latch: hook-and-eye, small hasp, or screw latch
- Roofing options: cedar shakes, thin cedar sheet, or plywood with flashing
- Optional: aluminum or plastic flashing for roof and drip edges
- Predator baffle material if pole-mounting
- Non-toxic exterior finish (water-based spar urethane or raw linseed oil for outside only)
Tools:
- Saw: miter saw, handsaw with miter box, or table saw for ripping strips
- Drill/driver with bits: 1 inch–1 1/2 inch spade or Forstner bit for entrance
- Countersink bit, small brad nailer or hammer, square, clamps
- Sandpaper (120–180 grit), pencil, ruler/tape, safety glasses/ear protection
- Optional: chisel for notching, file/rasp for smoothing
Approximate cut list (adjust for your target species):
- Base: 6×6 inches (3/4 inch thick)
- Back panel: 6×12 inches (serves as mount and attachment for roof)
- Roof: 7×8 inches single-slope (hinged on back) or two gable panels 7×6 inches
- Logs: 3/4×3/4 strips cut to lengths that stack to a 5×5 inch interior. For a 10-inch wall height, plan 14–16 courses, with typical lengths around 7 inches (front/back courses) and 6.5 inches (side courses), accounting for overlap. Cut extras for mistakes.
Small details that make a big difference:
- Roughen an interior “ladder”: Use a saw to kerf the inside wall below the entrance
- Four 1/4 inch drainage holes in the base
- Ventilation gap: 1/4 inch under the roof or two small side vents near the top
- Slightly recessed floor (1/8–1/4 inch above the base perimeter) to discourage rot
Save or organize your offcuts: they’re perfect for shims, cleats, and blocking inside the roof.
Cutting and prep for clean, accurate parts
Establish your footprint and wall geometry first, then cut parts in batches for consistency.
- Base and back panel
- Cut the base to 6×6 inches. Mark and drill four 1/4 inch drainage holes near the corners.
- Cut the back panel to roughly 6×12 inches. This panel will extend above the roof line to allow for easy mounting, and below the base for extra attachment points.
- Lightly sand edges to remove splinters.
- Entrance panel and hole layout
- For ease, choose the front wall “logs” to host the entrance hole. Stack and dry-fit your first 4–5 courses to confirm where the hole will land.
- Entrance height: measure up from the interior floor line. Mark the center for the entrance hole 4–6 inches above the finished floor for most small cavity nesters.
- Drill a clean entrance using a Forstner or spade bit: 1 inch for house wrens, 1 1/8 inch for chickadees, 1 1/4 inch for nuthatches, 1 1/2 inch for bluebirds and tree swallows.
- Lightly chamfer the exterior edge to shed water and prevent splintering. Do not add a perch; it helps predators.
- Logs and course planning
- Rip or buy 3/4×3/4 strips. Cut pairs for each course: two longer “front/back” logs and two slightly shorter “side” logs so they overlap at the corners in alternating fashion (standard cabin style).
- Dry-fit 12–16 courses to visualize your wall height, checking square and interior clearance for your target species.
- Optional interlocking: You can notch each log half its thickness at the ends to interlock. This is more advanced but increases lateral strength. For an easy build, the overlap method with glue and brads is sufficient when paired with a solid back panel.
- Ventilation and interior ladder
- Saw shallow kerfs on the inside surface below the entrance hole (2–4 vertical kerfs about 1/16 inch deep) to help fledglings climb out.
- Plan a 1/4 inch gap under the roof panel at the front or sides for passive ventilation, or drill two 3/8 inch holes high on the side walls.
- Roof preparation
- Choose a simple single-slope roof that hinges on the back for clean-outs. Cut the roof panel to overhang all sides by at least 3/4 inch. If you’ll add shingles, leave a bit more overhang.
- Pre-drill hinge holes on the roof back edge and back panel top edge.
Quick tip: Keep a small “story stick” with key dimensions and hole heights marked. It speeds up layout and keeps duplicate builds consistent.
Step-by-step assembly of the log-cabin bird house
With parts cut and prepped, assembly goes quickly. Set up a square, flat surface and have clamps ready to keep courses aligned as glue sets.
- Attach base to back panel
- Butt the base against the back panel and fasten through the back panel into the base with two exterior screws. Use glue for additional strength. Ensure the base is perfectly perpendicular to the back panel.
- Raise wall courses
- Apply a thin bead of exterior wood glue to the base perimeter where the first course will sit. Lay the first four logs, alternating long and short to create overlapped corners. Check square.
- Pin each log with two brads per end (or use small screws). Wipe any glue squeeze-out from the interior.
- Continue stacking courses, alternating the overlapping corners each course. Periodically check that the interior dimensions stay consistent and the walls are vertical. Clamp if necessary to correct any drift.
- Create the entrance course
- When you reach the planned entrance height, install the pre-drilled entrance logs at the front. Dry-fit first to ensure the hole is centered and at the right elevation above the floor line.
- Install the interior floor (optional raised floor)
- For superior drainage and longevity, add a thin interior “floating” floor panel cut 1/8–1/4 inch smaller than the interior footprint. Support it with small cleats glued to the inside walls. This lifts the nest above any water that might get in and adds insulation.
- Build up to the roof level
- Stop stacking when your interior height reaches 8–10 inches above the floor (depending on species). Add a final course that forms a tight, level seat for the roof.
- Maintain a 1/4 inch gap at the top front or sides for ventilation by slightly notching or spacing your top course, or by using low-profile spacers under the roof panel.
- Hinge and latch
- Install hinges on the back edge, attaching the roof to the back panel. On the front, add a simple hook-and-eye or screw latch to keep raccoons and squirrels from prying it open.
- Check the roof swings freely and closes snugly. Avoid foam gaskets in the interior; if you need a weather strip, use a thin exterior-grade strip on the roof underside and keep it minimal.
Mid-build workstation tip: A compact, safe, and well-organized shop setup makes precise assembly easier and faster. If you want a layout plan and gear list tailored to small spaces, check out UltimateSmallShop – The Next Woodworking Blockbuster!.
- Final checks
- Verify drainage holes are unobstructed.
- Confirm interior ladder kerfs are present beneath the entrance.
- Ensure no nail tips or screws puncture into the interior. File or sand any rough edges.
Roof, weatherproofing, mounting, and predator protection
Your roof and mounting choices affect longevity, comfort, and safety for birds. Aim for a roof that sheds water, ventilates the cavity, and allows easy access for cleaning.
Roof options
- Single-slope shed roof: Simple and effective. Hinge on the high edge at the back; slope down toward the front to shed rain.
- Gable roof: Attractive cabin aesthetic. One roof panel can hinge while the other remains fixed; ensure weather overlap at the ridge.
- Shakes/shingles: Thin cedar shingles over a solid roof add texture and durability. Use stainless or galvanized fasteners. Add metal flashing for extra protection on the top edge if desired.
Keep finishes bird-safe
- Do not paint or seal the interior. Birds are sensitive to fumes and chemicals.
- Exterior only: Use a breathable, water-based spar urethane or natural oil (raw linseed) applied thinly. Leave the entrance ring bare or lightly oiled.
- Avoid dark colors that absorb heat in hot climates. Natural wood or light earth tones are best.
Mounting guidelines
- Mount on a metal pole (with a baffle) or on a fence post/wall bracket. Avoid nailing directly into living trees; it can injure the tree and make the box easier for predators to reach.
- Orientation: Face the entrance east or southeast to catch morning sun and avoid prevailing winds. Partial shade in hot climates helps keep the box cool.
- Heights: Wrens 5–10 ft; chickadees 5–15 ft; bluebirds 5–7 ft in open habitat; nuthatches 5–15 ft near mature trees.
- Spacing: Keep boxes well-separated, especially bluebird and tree swallow houses to reduce territorial conflicts.
Predator protection basics
- Add a stovepipe or cone baffle on the pole under the box to deter raccoons and snakes.
- Consider an entrance hole guard or an extended wooden block around the hole to increase the depth predators must reach through.
- Avoid perches and nearby branches that provide “launch pads” for predators.
- Place boxes away from brushy ambush cover when targeting bluebirds.
For a deeper dive into box placement and predators, see guidance from National Audubon Society and RSPB; links are at the end of this article.
Finishing touches, seasonal maintenance, and long-term care
A bird house is more than a build—it’s a long-term habitat. Finishing correctly and setting a maintenance routine keeps it safe and inviting for years.
Finishing
- Sand exterior edges lightly to remove splinters and shed water.
- If painting, stick to exterior latex paints on the outside only. Use light, natural colors. Never paint the interior or the entrance rim.
- Apply finish after a dry fit to reduce glue bond issues. Keep glue joints bare; seal once assembly is complete.
Maintenance schedule
- Pre-season (late winter): Inspect mounting hardware, tighten hinges/latches, ensure baffle is intact. Clear old nests and debris. A quick rinse and air-dry is sufficient; avoid harsh cleaners.
- Mid-season: Minimal disturbance. Observe from a distance. If wasps attempt to build, gently remove early on a cool morning before birds nest.
- Post-season (late summer/fall): Clean out spent nests to deter parasites and rodents. Check for loose fasteners or rot. Refresh exterior finish if needed.
Hygiene and safety
- Wear gloves and a dust mask when cleaning out old nests to avoid mites and spores.
- Do not use pesticides or chemical cleaners inside the box.
- If mites are an issue, remove nesting material, let the interior sun-dry, and lightly wipe with a damp cloth. Allow to fully dry before closing.
Winter use
- Many boxes serve as winter roosts. Leave the box up year-round. In colder regions, add a temporary interior panel to reduce volume and keep roosting birds warmer. Remove before nesting season begins.
- Insulation considerations: The log-cabin wall design provides improved insulation compared to thin plywood boxes, helping moderate temperature swings.
Legal and ethical notes
- In North America, native birds are protected by law; do not disturb active nests except for permitted research. Avoid enabling non-native invasive species (e.g., house sparrows, European starlings). Learn to identify them and remove their nesting material promptly if legally allowed.
- Follow science-based recommendations for monitoring: Cornell Lab’s NestWatch program provides a code of conduct that balances education with bird safety.
Placement, monitoring, and troubleshooting for better nesting success
Great woodworking won’t overcome poor placement. Combine smart siting with light-touch monitoring to boost your success rate and protect wildlife.
Placement and habitat
- Bluebirds prefer open, grassy spaces with low vegetation. Keep boxes 100–300 feet from dense trees and brush that harbor predators.
- Chickadees and nuthatches like wooded edges or yards with mature trees. Offer dappled shade.
- Wrens tolerate more varied sites and occasionally nearer to shrubs, but avoid heavy cover where cats lurk.
Orientation and microclimate
- Face entrances east/southeast for morning sun; adjust for your region’s dominant winds.
- Provide shade in hot climates; increase ventilation gap size if summers are intense.
- In very wet regions, increase roof overhang and add a drip kerf beneath the roof edge.
Monitoring
- Observe discreetly. Open the box only between nest attempts or when adults are away, and minimally. Follow NestWatch’s ethical guidelines for checking boxes to prevent disturbance.
- Keep notes on occupancy, clutch size, and fledging success. This helps refine placement year to year.
Troubleshooting common issues
- Ants or wasps: Rub a very light ring of petroleum jelly under the roof edge and near the latch—not on the entrance. Remove wasp starts early in the season before use by birds.
- Excess moisture: Verify drainage holes are clear and ventilation gaps are open. Increase roof overhang or add flashing.
- Overheating: Increase shade or ventilation; consider a lighter exterior color. In extreme heat waves, temporary shade cloth can help.
- Predation evidence: Add or upgrade pole baffles and entrance guards. Move the box to a more open location. Eliminate nearby climbing aids.
If you’re interested in scaling your builds or adding storage for your birding gear, a simple yard shed can be a great next project. For plan sets that include small outdoor structures and yard storage, see My Shed Plans.
Get printable plans and set up a compact, capable workshop
If you prefer printable templates, full cut sheets, and multiple variations for different species, consider:
- TedsWoodworking: A large library of woodworking plans, including outdoor projects and small wildlife boxes. Handy when you want multiple bird box sizes and entrance options without redrawing.
- UltimateSmallShop – The Next Woodworking Blockbuster!: A practical guide to setting up an efficient shop in tight spaces. Great for consistent, accurate results even with modest tools.
- My Shed Plans: Useful if you’re expanding into garden structures and need clear, step-by-step plan sets.
These resources complement the free plan in this article and help you tailor your bird houses to more species and yard conditions.
Conclusion: Build once, attract birds for years
With these free bird house plans for a log cabin–style, easy homemade bird box, you’re set to build a durable, wildlife-safe home that looks as good as it functions. The stacked-log design is forgiving for beginners, customizable for different birds, and strong enough to withstand real weather. Follow the species-specific hole sizes, include drainage and ventilation, mount with a baffle, and keep up with simple maintenance. You’ll enjoy spring songs, fledgling first flights, and the satisfaction of a handmade habitat that truly helps.
When you’re ready for printable templates and more outdoor plan variety, explore TedsWoodworking. For a smart small-shop setup that makes every cut cleaner and every build faster, see UltimateSmallShop – The Next Woodworking Blockbuster!.
Frequently asked questions
What wood is best for a log-cabin bird box?
Cedar is the top pick because it resists rot, sheds water, and stays dimensionally stable outdoors. Cypress, redwood, and well-sealed pine also work. Avoid pressure-treated lumber for nesting cavities due to chemicals.
What size should the entrance hole be for my Free Bird House Plans (Log Cabin) – EASY Homemade Bird Box?
Match the species: 1 inch for house wrens, 1 1/8 inch for chickadees, 1 1/4 inch for nuthatches, and 1 1/2 inch for bluebirds and tree swallows. Drill the hole 4–6 inches above the floor and lightly chamfer the outer edge.
How big should the box be inside?
For most backyard species, a 5×5 inch floor and 8–10 inches interior height is ideal. Wrens and chickadees can use slightly smaller floors (around 4.5×4.5 inches). Keep interior smooth and unpainted; add ladder kerfs under the entrance.
Can I paint or stain the bird house?
Paint or finish only the exterior. Use light, natural colors or a clear, water-based exterior finish. Do not paint or seal the interior or the entrance rim. Let finishes cure fully before mounting.
Where should I mount the log-cabin bird house, and at what height?
Face east or southeast for morning sun. Bluebirds prefer open areas at 5–7 feet. Chickadees and nuthatches prefer wooded edges at 5–15 feet. Use a metal pole with a baffle or a sturdy wall/post mount; avoid trees when possible.