
A pallet shed can be an affordable, sturdy, and satisfying weekend project—especially if you love upcycling and smart DIY. This detailed guide for building a pallet shed covers everything from safe pallet selection and planning, to foundations, framing, roofing, and weatherproofing, so your shed lasts through all four seasons. Whether you’re eyeing a compact garden tool shed or a mid-sized storage space, you’ll get clear steps and pro tips to avoid common pitfalls.
If you prefer to work from ready-made drawings and cut lists while you follow along, consider using My Shed Plans as a companion resource. It can help you adapt dimensions and hardware choices to your exact design.
Table of Contents
Detailed Guide for Building a Pallet Shed: Planning and Design
Good planning is what turns the idea of a pallet shed into a durable outbuilding that passes the test of time. Start by defining purpose, size, and placement, then consider local rules, materials, and a realistic timeline.
- Purpose and size: List what you’ll store (lawn gear, bikes, potting bench). Add 20–30% extra floor space for future needs. Common footprints include 6×8, 8×10, and 8×12 feet.
- Design style: Single-slope (lean-to) roofs are beginner-friendly and shed water well. Gable roofs add headroom and classic curb appeal.
- Doors and access: Double doors fit mowers and bikes; include a ramp if needed. Plan door opening width early to avoid last-minute rebuilds.
- Windows and light: Even one polycarbonate or salvaged window reduces the need for interior lighting and keeps moisture lower.
- Storage: Sketch shelving, hooks, and lofts before framing. It’s easier to integrate blocking now than later.
Permits and codes: Many municipalities allow small sheds without a full permit up to a certain size, but setback and height limits often apply. Confirm requirements with your local building office or consult the International Code Council for general code references. If your shed includes electrical, you’ll likely need permits and inspections.
Timeline and crew: A dedicated DIYer can typically complete a mid-size pallet shed over two to three weekends. Complex roofs, site grading, and weatherproofing may add extra days.
Documentation: Create a simple plan set with:
- Scaled floor plan with overall dimensions
- Elevations for each side
- Foundation layout
- Roof plan and section
- Basic materials list
If you want a head start on drawings and cut lists, My Shed Plans offers ready-made plans you can adapt to pallet-based construction.
Detailed Guide for Building a Pallet Shed: Safe Pallets and Materials
Not all pallets are created equal. A safe, dry, and structurally sound pallet shed starts with the right raw materials.
How to choose pallets:
- Look for the “HT” stamp. HT means heat-treated, not chemically fumigated. Avoid any pallets marked “MB,” which indicates methyl bromide treatment.
- Skip pallets with oil stains, chemical smells, mold, or rot.
- Prefer pallets with thicker stringers and tight, intact boards. Hardwood pallets are sturdy, softwoods are lighter; both work if in good condition.
- Consistency matters. Matching pallet sizes and types simplify wall layout and reduce shimming.
- If in doubt, validate treatment markings against guidance like FAO ISPM 15 and avoid any questionable pallets.
Other core materials:
- Pressure-treated lumber for skids, rim joists, and any wood touching ground.
- Structural screws and structural nails for framing; exterior-rated coated or stainless fasteners for longevity.
- Heavy-duty metal brackets, angle plates, and hurricane ties to reinforce pallet connections and rafters.
- Sheathing (OSB or plywood) for roof and select wall areas; consider using full sheathing on walls for rigidity even if cladding with pallet slats.
- Roofing underlayment, drip edge, and shingles or metal panels.
- Housewrap or weather-resistive barrier behind siding to control moisture.
- Flashing tape and metal flashing for doors, windows, and roof-wall intersections.
Disassembly vs. whole pallets:
- Whole-pallet walls go up fast. You’ll add bracing, sheathing, and cladding to tie everything solidly together.
- Disassembled pallets provide free slats for cladding, interior shelves, and trim. A mix of whole-pallet framing plus reclaimed slats for exterior looks is common.
Safety note: Avoid MB-stamped pallets. Methyl bromide is a pesticide with health and environmental risks; see the U.S. EPA on methyl bromide for background.
Tools, Workspace Setup, and Safety
Having the right tools—and a safe workflow—speeds up the build and improves results.
Essential tools:
- Circular saw (with a sharp framing blade)
- Drill/driver and impact driver
- Hammer, nail set, and cat’s paw for pallet work
- Pry bar and reciprocating saw (with demolition blades) for pallet disassembly
- Speed square, framing square, long level, and measuring tape
- Chalk line and string line for layout
- Shovel, tamper, and garden rake for site prep
- Stapler for housewrap and underlayment
- Utility knife, shears, and snips for flashing and roofing
Nice-to-have tools:
- Miter saw for accurate angle cuts
- Table saw for ripping sheathing and trim
- Pocket-hole jig for hidden joinery on built-ins
- Brad nailer or finish nailer for trim work
Safety essentials:
- Eye and ear protection, dust mask/respirator when cutting or sanding
- Gloves suited to pallet handling (splinters are real)
- Stable ladders and roof brackets
- Clean, organized site to prevent trips and falls
If your workspace is small or shared with vehicles, a compact, organized layout saves hours. For step-by-step guidance on setting up an efficient shop in tight spaces, UltimateSmallShop offers practical strategies for tool selection, layout, and noise/dust control that can make your build safer and more enjoyable.
Prep your materials: Sort pallets by size and condition; pre-cut blocks, cleats, and temporary braces. Stage fasteners and brackets in bins so you’re not hunting mid-build.
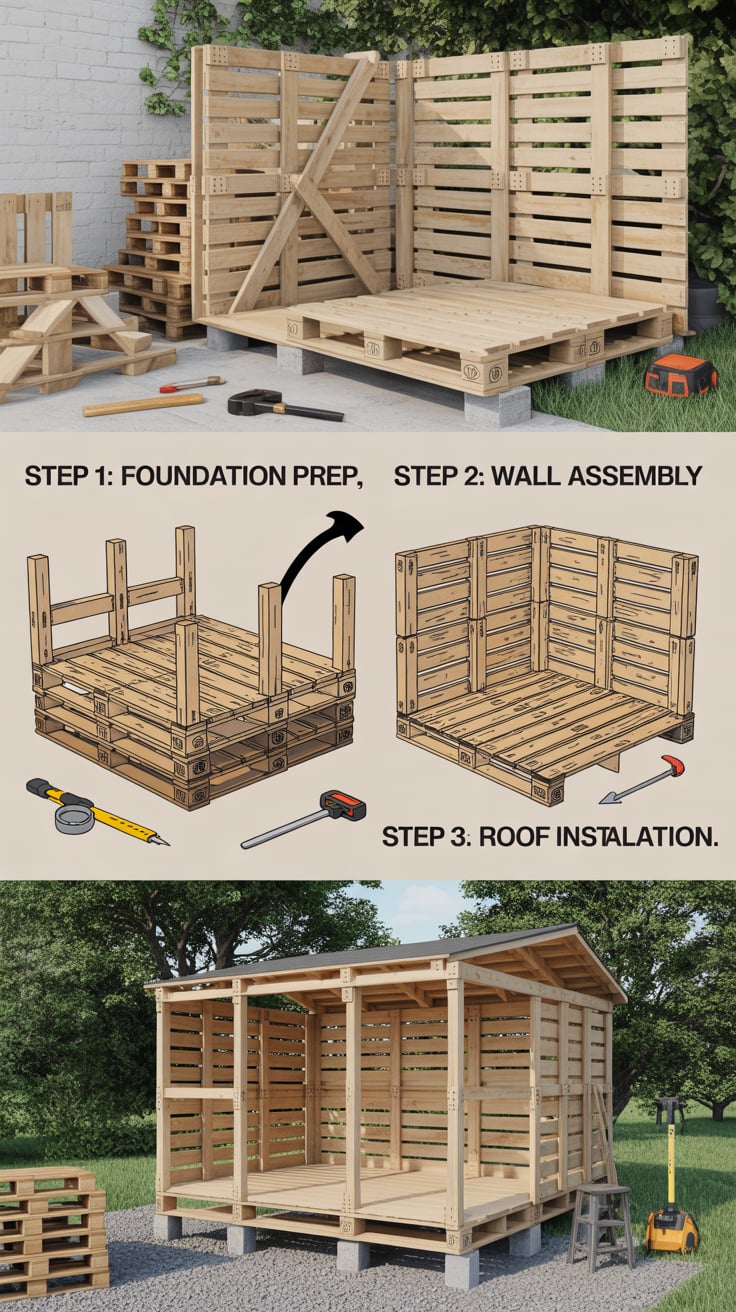
Detailed Guide for Building a Pallet Shed: Foundation and Site Prep
A shed’s longevity is built from the ground up. A flat, well-drained foundation keeps water out and doors swinging freely year-round.
Pick the spot:
- Choose a location with good drainage and 6–8 hours of sun to help keep siding dry.
- Leave space for door swing and a ramp; plan a clear path from driveway or garden.
- Mind setbacks and easements; check local rules or refer to the International Code Council for general guidance.
Common foundation options:
- Gravel pad with skids: Dig down 4–6 inches, remove organic material, and compact layers of crushed stone. Set pressure-treated 4×4 or 4×6 skids level on the pad. Fast and economical for light to mid-sized sheds.
- Concrete deck blocks: Place on a compacted gravel base at corners and intervals under floor joists. Check level across all blocks using string lines.
- Concrete piers: Best for sloped sites, frost-prone regions, or heavier sheds. Auger holes below frost depth, set tubes, and pour. Connect beams or brackets above. More work up front but very stable.
Gravel pad basics:
- Outline the footprint with stakes.
- Excavate and compact in two or three lifts for stability.
- Use a long level, straight 2x, and string lines to ensure a flat plane.
- Slightly crown the center or ensure water runs to the sides.
Anchoring: In windy areas, add ground anchors or anchor straps tied to the floor frame or skids. For pier foundations, use metal post bases or straps embedded in concrete to tie the shed structure down.
Drainage: Maintain 6–8 inches of clearance from grade to the bottom of your siding. A drip edge of gravel around the perimeter reduces splash-back and mud.
Building the Floor Frame and Deck
Think of the floor as your platform for square, plumb walls. Get this right, and the rest flows.
Framing:
- Use pressure-treated 2×6 or 2×8 joists depending on span and load. Typical spacing is 16 inches on center; 12 inches on center for heavier loads or thinner decking.
- Build a rectangular rim with treated 2x lumber, checking for square using the 3-4-5 triangle or diagonal measurements.
- Add joists inside the rim, crown them upward, and secure with structural screws or joist hangers.
Decking:
- 3/4-inch exterior-grade plywood or OSB provides a solid, smooth base. Stagger seams and leave a 1/8-inch expansion gap between panels.
- Glue and fasten: Construction adhesive on joists plus screws every 6–8 inches on edges and 12 inches in the field reduces squeaks.
- If you’re using whole pallets as a floor, set them on skids or beams, shim to level, and add a continuous layer of plywood on top to distribute loads.
Integrating pallets:
- For walls, pre-plan pallet layout so wall heights are consistent. You can oversize your floor slightly and trim after install for a perfect finish.
- Add blocking between joists beneath where walls will sit; this helps transfer loads and gives you solid screw targets.
Moisture control:
- Staple a ground vapor barrier under the gravel pad (if local conditions warrant) to limit moisture migration.
- Consider a sill gasket or flashing tape between treated floor frame and any metal brackets to minimize corrosion.
For fastening details on sheathing and subfloor, consult guidance from APA – The Engineered Wood Association.
Framing Walls, Openings, and the Roof Structure
Pallet walls can be quick and sturdy when you tie them into a unified frame.
Layout:
- Snap chalk lines on the deck to mark wall positions.
- Build or place pallets to form each wall section. Align bottom edges along the line and clamp sections together before fastening.
Attaching pallets:
- Through-screw pallets into the floor frame with long structural screws through bottom rails or cleats. Use angle brackets at the base and corners.
- Stitch adjacent pallets together at seams with steel plates or 2x cleats on the interior side. Add vertical 2x studs inside pallets where needed for door/window framing.
- Sheath at least the corners and door wall with OSB or plywood to create rigid shear panels, even if you plan to clad with pallet slats later.
Openings:
- Frame door and window openings with proper headers. For a typical 36-inch door in a single-story shed, a doubled 2×6 or 2×8 header is common, supported by jack studs.
- Check plumb and level constantly. Shim where needed before fully fastening.
Roof options:
- Single-slope (lean-to): Simplest to build and great for rain/snow shedding. Set the high wall 6–12 inches taller, install rafters at 16–24 inches on center with hangers, and overhang eaves 8–12 inches for protection.
- Gable: Offers more headroom and storage loft options. Build trusses on the deck using a simple jig or set individual rafters with ridge board and collar ties.
Roof sheathing and ties:
- Use 1/2-inch or 5/8-inch roof sheathing depending on rafter spacing. Nail per the schedule recommended by APA – The Engineered Wood Association.
- Add hurricane ties on each rafter for uplift resistance, especially in windy areas.
Before moving on to roofing and cladding, step back and sight down walls to ensure they’re straight. Re-square if necessary; corrections get harder later.
Weatherproofing, Cladding, Roofing, and Interior Finishing
This stage turns a framed box into a weather-tight shed that protects your tools through the seasons.
Weather barrier and flashing:
- Wrap exterior walls with housewrap, lapping seams per the manufacturer’s instructions.
- Add window and door flashing with butyl tape and metal head flashings.
- Install a continuous drip edge at eaves and rakes before roofing.
Roofing:
- Underlayment: Synthetic underlayment is durable and light; overlap correctly to shed water.
- Finish material: Asphalt shingles are budget-friendly; metal panels last long and shed snow well. Follow manufacturer nailing/screw patterns and ventilation requirements.
- Ventilation: Ridge vents and soffit vents promote airflow, reducing moisture in the roof assembly.
Cladding:
- Pallet slats: Attractive and budget-friendly. Pre-prime and back-paint slats for longevity; leave small gaps for expansion and drainage.
- Plywood and batten (board-and-batten look): Fast coverage with rustic appeal; add battens over seams.
- Corrugated metal: Rapid installation and minimal maintenance.
- Fiber-cement or vinyl siding: Durable options if you want a lower-maintenance envelope.
Doors and hardware:
- Reinforce door edges with 2x framing. Use heavy-duty strap hinges and a reliable hasp/lock.
- Consider a threshold and drip flashing above doors to keep water out.
- Build a simple ramp from treated 2x material and textured decking for traction.
Interior finishing:
- Add blocking and cleats for shelves before wall cavities are closed (if sheathing inside).
- Pegboard, French cleats, and overhead lofts maximize storage.
- Simple LED shop lights and a solar motion light at the entry improve usability.
Paint and stain:
- Use exterior-grade primer and paint or penetrating stain with UV inhibitors. Seal end grain and cut edges thoroughly.
If you want pre-drawn layouts for doors, windows, and roof variations that adapt well to pallet builds, browse TedsWoodworking for a large collection of DIY-friendly plans you can tailor to your dimensions.
Time, Cost, and Common Mistakes
Time and cost vary with size, finishes, and how many pallets you reclaim. Many DIYers complete a mid-sized pallet shed over two to three weekends, with costs driven by roofing, fasteners, and treated lumber for the foundation and floor. Reclaimed pallets can lower expenses considerably, but plan extra time for sorting and prep.
Common mistakes to avoid:
- Using questionable pallets: Skip stained, MB-marked, or rotten pallets.
- Skimping on foundation: A shed that’s out of level leads to stuck doors and pooling water.
- Inadequate bracing: Pallet walls need shear panels, diagonal bracing, or full sheathing.
- Poor flashing: Water intrusion at doors, windows, and roof edges shortens shed life.
- Wrong fasteners: Use exterior-rated or stainless hardware to prevent corrosion.
- No ventilation: Trapped moisture leads to mold and rusted tools.
Recommended resources
- Plans for small and mid-size sheds: My Shed Plans
- Comprehensive woodworking plan library: TedsWoodworking
- Setting up a compact, efficient build space: UltimateSmallShop
- Optional: Interested in turning your builds into income? WoodProfits shares general guidance on selling woodworking projects.
Conclusion
With a solid plan, safe materials, and careful attention to foundations, bracing, and weatherproofing, this detailed guide for building a pallet shed gives you everything you need to create a durable, budget-friendly outbuilding. Pallets keep costs down, while smart upgrades—like proper flashing, quality roofing, and exterior-grade fasteners—extend service life. Use the steps above as your roadmap, and lean on ready-made drawings when you want shortcuts. Your tools and garden gear will thank you with years of dry, organized storage.
FAQ
What size pallets are best for a pallet shed?
Standard 48×40-inch HT-stamped pallets are common and easy to design around. Consistency helps with wall alignment and reduces shimming.
How many pallets do I need for an 8×10 shed?
Expect roughly 18–26 pallets for walls depending on height and layout, plus extra for cladding and mistakes. Buy or collect a few more than your estimate.
Is this Detailed Guide for Building a Pallet Shed suitable for beginners?
Yes. If you can operate basic tools and follow measurements, you can build a sturdy pallet shed. Start with a single-slope roof for simplicity.
Are chemically treated pallets safe to use?
Avoid any pallets marked “MB.” Choose heat-treated (“HT”) pallets and skip those with stains, odors, or rot. When in doubt, don’t use it.