
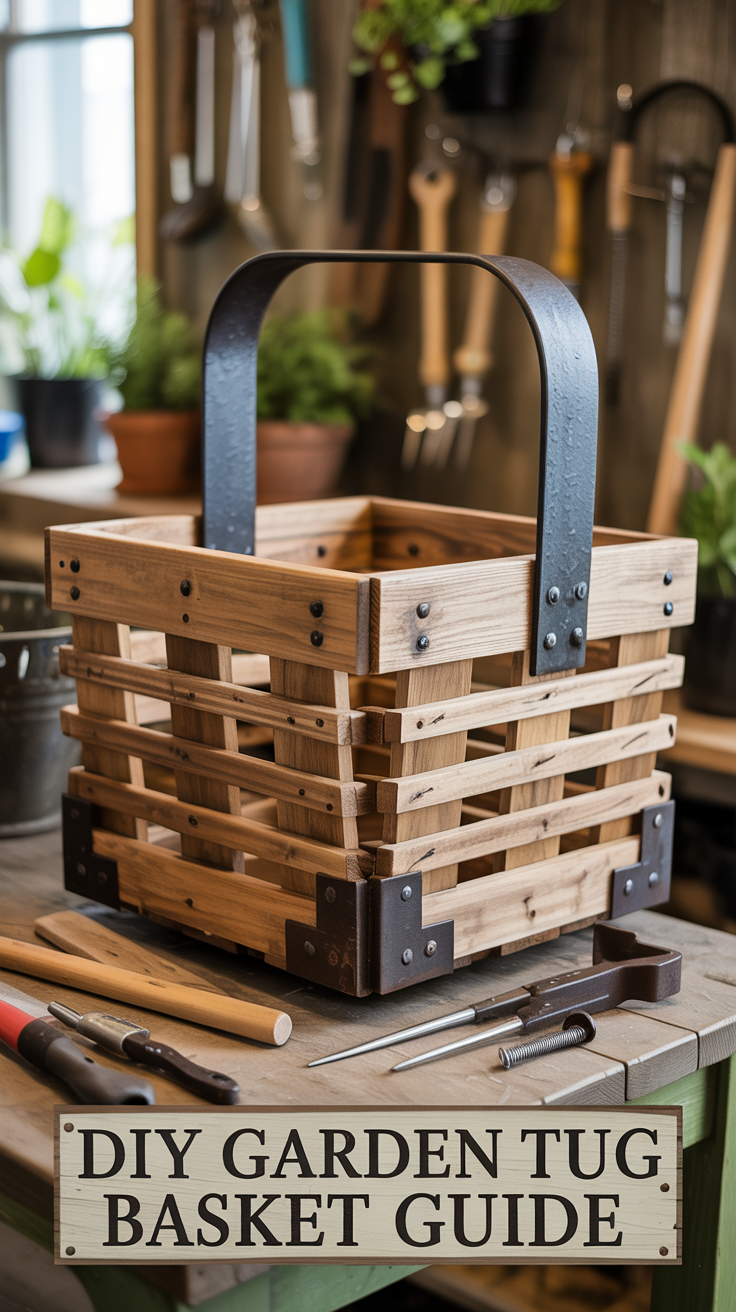
If you want a durable, handsome carrier for harvests, tools, and cut flowers, learning how to build a tug basket from wood and metal garden is a rewarding project. Often called a garden trug, this shallow, lightweight basket blends curved wood slats with a sturdy metal rim or reinforcing straps. The classic design is strong yet elegant, rides comfortably on the forearm, and lasts for years with simple care. In this guide, you’ll plan, build, and finish a trug-style tug basket using accessible tools and materials—ideal for weekend woodworkers who want practical beauty in the garden.
Before we dive in, if you like working from clear plans, a resource like TedsWoodworking can help you browse designs and layouts so you can adapt a pattern to your exact needs.
Table of Contents
Understanding the tug basket design and use
A tug (trug) basket is a shallow, oval carrier with side slats and a central handle, traditionally steam-bent from willow or ash and riveted with copper. Modern DIY versions commonly use thin hardwood slats for the shell, a bent wood or laminated rim and handle, and light metal reinforcement—galvanized strap, brass strip, or stainless screws and washers—to add longevity.
- Typical size: 18–22 inches long, 10–12 inches wide, 4–6 inches deep
- Typical capacity: Plenty for a morning harvest of greens, herbs, and tomatoes, or a set of hand tools and gloves
- Weight: 2–4 lb depending on wood species and hardware
- Design options:
- Classic slatted sides with a bent rim and central arch handle
- Plywood base with hardwood slats and a metal band
- Mesh-bottom trug with thin slats above for structure and a ventilated underside
Core benefits in the garden
- Ergonomics: The central arch handle balances loads well and keeps your wrist neutral.
- Breathability: Slatted sides and optional mesh base let soil and moisture shake out—perfect for produce.
- Durability: Hardwood slats and corrosion-resistant metal fasteners stand up to damp use.
Basic parts in your build
- Base: Solid panel (cedar, cypress, or marine plywood) or a slatted base with small feet
- Ribs: Two or more arched ribs that define the oval profile
- Side slats: Thin, flexible strips that wrap around and attach to the ribs
- Handle: A bent or laminated arch attached through the base and rim
- Metal reinforcement: Perimeter band, corner straps, copper or brass rivets, stainless screws
Sizing the basket to your needs
Sketch your target load: a pair of secateurs, twine, gloves, and a dozen tomatoes requires a 20-inch-long basket with a medium arch to keep contents from rolling out. For cut flowers, a longer, shallower profile works wonderfully. Sketch the oval footprint, then trace two ribs that match your desired side height—this pair sets the curve for all slats.
Reference inspiration
- Timber facts by species: The Wood Database (wood-database.com)
- Garden harvest care: Royal Horticultural Society (rhs.org.uk)
Choosing wood and metal the smart way
The wood you choose dictates how easily your slats bend, how light your tug basket feels, and how long it resists weather. Select straight-grained boards with few knots, aim for 6–8% moisture content, and rip thin, even slats.
Best wood species
- Ash: Classic for bent work. Springy, resilient, bends readily. Not rot-proof; finish matters.
- White oak: Durable outdoors, bends OK (with steam or thin laminations). Heavier than ash.
- Cedar (western red / eastern red): Light and rot-resistant, but more brittle—use for base and rim, not tight bends.
- Cypress: Good weather resistance, works well, moderate bending in thin sections.
- Maple (soft/hard): Fine for slats if thin; use protective finish for moisture.
- Marine plywood: Stable base option, reduces splitting risk for fasteners.
Metal choices
- Galvanized steel strap: Affordable, easy to find; resists rust reasonably well.
- Brass strip: Traditional look, non-rusting; softer than steel.
- Copper rivets: Classic and attractive for fastening slats to the rim or handle.
- Stainless screws: Strong corrosion resistance for structural joints.
Hardware and adhesives
- Stainless screws (#6–#8, 3/4–1-1/4 inch)
- Small brass or copper nails (3/4–1 inch)
- Copper rivets and burrs (optional but beautiful)
- Waterproof wood glue (PVA Type II/III or polyurethane)
- Epoxy (for handle tenons into base, if you choose that style)
Safety essentials
- Eye and ear protection, dust mask, gloves for metal edges
- Non-slip work surface and stable clamps
See OSHA’s overview of PPE for shop work: Occupational Safety and Health Administration (osha.gov).
Cut list example for a 20 x 11 x 5 inch basket
- Base: 3/8-inch cedar panel, 18 x 8-1/2 inches (oval corners)
- Ribs (2): 1/2 x 1 inch white oak, curved to 5-inch rise
- Slats (10–14): 1/8 x 1 inch ash, lengths vary from 20–28 inches
- Rim: Two laminations of 1/8 x 1 inch ash, 68 inches each (trim after bending)
- Handle: Laminated ash, 3/4 x 1 inch cross-section, 22–24 inches long arched
- Perimeter strap: 3/4-inch brass or galvanized strip, ~60–64 inches
- Copper or brass fasteners as chosen
If you’re new to cutting lists and shop workflow, you might get value from UltimateSmallShop – The Next Woodworking Blockbuster!, which focuses on setting up efficient small shops—even in tight spaces—so your builds go smoother from board to basket.
Materials and tools to build a tug basket from wood and metal garden
A smooth experience comes from prepping all materials and tools before any bending or assembly. Here’s a focused list to keep your build on track.
Core materials
- Wood: 1 board foot each of ash and white oak (or your chosen combination), plus cedar for the base
- Metal: Brass or galvanized strap (3/4–1 inch wide), copper rivets and burrs, or stainless screws
- Adhesives: Waterproof PVA or epoxy for critical joints
- Finish: Boiled linseed oil, tung oil, or marine spar varnish
Tools and jigs
- Saw: Bandsaw or jigsaw for curved parts and rip cuts; handsaw for trimming slats
- Planer or hand plane: Bring slats to 1/8 inch consistently; a thickness sander is a bonus
- Spokeshave and rasps: Refine rim and handle profiles
- Clamps: Spring clamps for slats, F-clamps for laminations, small C-clamps for metal strap
- Drill/driver: Pilot bits, countersink, and step bit for metal where needed
- Hammer or riveting set: For copper/brass nails and rivets
- Files: To round over and de-burr metal strap edges
- Sanding: 120–220 grit for all surfaces
- Steam setup (optional): Kettle and PVC tube or commercial steamer for bending ash/white oak slats
- Heat-resistant gloves and apron (steam bending safety)
Simple bending strategies
- Thin laminations: Glue up two or three 1/8-inch laminations around a form for the rim and handle—no steam required and very reliable spring-back.
- Steam bending: For single-piece curves in ash or oak, steam 1 hour per inch of thickness; at 1/8 inch, 10–15 minutes often suffices. Bend immediately around a form and clamp.
Shop layout tips
- Make your bending forms first: Use plywood or MDF for the rim and handle curves. Cover the forms with packing tape or plastic wrap to prevent glue sticking.
- Group your operations: Rip all slats at once, then plane/sand to final thickness. Keep pairs of laminations taped together to avoid mix-ups.
- Stage fasteners: Pre-sort rivets, burrs, and screws in trays near the assembly area.
For more refined bending techniques and jigs, consider reviewing a comprehensive plan collection like TedsWoodworking to see how other curved projects approach forms and laminations.
Shaping the base, ribs, rim, and handle
These structural parts determine your basket’s final stance and strength. Spend time getting their curves consistent.
Base
- Layout: Draw an 18 x 8-1/2 inch rectangle with 2-1/2 inch corner radii to form a soft oval. If using slats, plan two longitudinal runners (feet) to elevate the basket.
- Cutting: Use a bandsaw or jigsaw to cut the profile. Clean up edges with a spokeshave or sanding block.
- Sealing: If the base is plywood, seal the edges with thin epoxy to prevent moisture ingress.
Ribs
- Purpose: Ribs define side height and help the slats hold shape. Two ribs centered along the base length is typical.
- Template: Create one rib template from 1/2-inch MDF; trace and cut two matching ribs in white oak.
- Joinery: Pre-drill the base and ribs to accept stainless screws from below and glue faces. Countersink screw heads.
Rim and handle
- Rim: Use two 1/8-inch laminations of ash or oak, glued around a bending form matching your base perimeter plus the final side height. Let cure overnight.
- Handle: Laminate or steam-bend to a comfortable arch; allow 4–5 inches of rise above the rim for finger clearance.
- End treatment: Tenon the handle ends to fit through the rim and into the base, or mount to rib tops with screws and a backing block.
Metal preparation
- Strap edges: File and sand the metal strap to soften edges and corners. Remove burrs thoroughly.
- Pre-drill: Mark holes at even intervals (every 3–4 inches) for fastening the strap to slats or rim. Pilot with a small bit and finish with a step bit for clean holes.
Pro tip: Orientation matters
When cutting slats from a board, keep growth rings consistent across slats to reduce uneven bending and cupping. Slightly “crown” the rim’s top edge with a spokeshave for a comfortable hand feel.
Authority references for wood behavior and bonding
- USDA Forest Products Laboratory (fpl.fs.usda.gov) for wood properties and adhesive basics
- The Wood Database (wood-database.com) for species-specific bending and durability info
Attaching slats and integrating metal for strength
This is the satisfying part where your basket takes shape. Work methodically, and keep symmetry as you add slats.
Layout and sequence
- Mark centerlines on the base, ribs, and rim.
- Position the ribs on the base with glue and screws; confirm square and alignment.
- Dry-fit the rim to the rib tops to check perimeter fit; trim as needed.
Slat preparation
- Thickness and width: Aim for consistent 1/8 x 1 inch slats. Pre-sand faces and ease edges.
- Pre-bend: Steam or soak stubborn slats before installation; a gentle pre-bend around a form reduces stress and cracking.
- Pilot holes: Pre-drill near slat ends to prevent splits when nailing or screwing to ribs and rim.
Fastening slats
- Start at the basket’s centerline: Attach a slat on each side of center to the ribs. Use copper/brass nails or small stainless screws. Then add slats symmetrically, alternating sides to balance the build.
- Maintain even gaps: A simple spacer stick ensures consistent spacing for airflow and aesthetics.
- Transition to rim: Once slats are fixed to ribs, bring the tops to the rim, trim flush, and fasten into the rim with nails, rivets, or screws.
Adding the metal band
- Placement: A perimeter strap around the rim adds dent resistance and charm. Seat the strap about 1/8 inch below the rim’s top edge.
- Attachment: Align pre-drilled holes with slat/rim intersections. Use copper rivets (through holes with burrs peened on the inside) or brass screws with finishing washers.
- Overlap: Plan a tidy 1-inch overlap at the strap’s end; file a tapered scarf or round the overlap corner for a clean look.
Handle installation
- Through-rim and base: Drill matching holes in the rim and base; epoxy the handle tenons through the rim into base sockets for maximum strength.
- Rib-top mount: Alternatively, seat the handle ends in shallow mortises atop ribs and secure with stainless screws and a backing block tucked beneath the rim.
Metal mesh option
For wet harvests, you can add stainless or galvanized wire mesh to the bottom:
- Cut mesh to fit the base oval, leaving a 1/2-inch margin.
- Sandwich the mesh between the base and small perimeter cleats from below, using stainless staples and screws.
- File any stray wire ends to avoid snags.
Mid-build efficiency tip
Stage clamps and fasteners where you can reach them with one hand; curved assemblies demand constant control. A smart, compact setup like those outlined in UltimateSmallShop – The Next Woodworking Blockbuster! can make these steps far less hectic in small garages or sheds.
Finishing details for comfort, durability, and style
With the structure complete, tune the basket to be comfortable in the hand and resilient outdoors.
Edge treatment
- Rim: Ease the edges to a soft 3/32-inch roundover with a spokeshave or sandpaper wrapped around a dowel.
- Slats: Lightly break edges so they don’t bruise delicate greens or your knuckles.
- Metal band: Finish with 220-grit paper and a Scotch-Brite pad for a satin sheen; remove oxidation.
Surface sanding
- Work through 120–180–220 grits, keeping pressure light to avoid thin spots on slats.
- Vacuum dust from crevices, especially under the rim and around metal fasteners.
Finish choices
- Oil (boiled linseed or polymerized tung): Warm, traditional look; easy to renew. Apply 2–3 coats, wiping excess.
- Oil/varnish blend: Slightly tougher film with a hand-rubbed feel.
- Marine spar varnish: Maximum moisture resistance; 3–4 thin coats, sanding lightly between.
- Hybrid approach: Oil first for depth, then two coats of spar varnish on high-wear areas (rim, handle, base edges).
Hardware accents
- Copper rivets: A gentle peen forms a low-profile, beautiful head; practice on scrap to avoid mushrooming too much.
- Brass screws with finishing washers: Classic nautical vibe and practical bearing surface on thin slats.
Personalization
- Branding or burning: Add initials or a small logo on the base underside with a branding iron or woodburner.
- Dye or stain: Keep light; darker finishes can hide grain on ash and oak. Test on offcuts first.
- Leather grip: Wrap a leather strip around the handle’s apex for better grip when wet.
Care and maintenance
- Off-season storage: Keep the basket indoors or in a dry shed to prolong finish.
- Fastener check: Once a season, snug any screws and touch up oil or varnish.
- Cleaning: Rinse mud, let dry fully, re-oil as needed.
Design variations to build a tug basket from wood and metal garden
Once you complete a standard oval, try variations tailored to how you garden.
Long-stem trug
- Purpose: Carry long-stem cut flowers or chard without bending or bruising.
- Dimensions: 24–28 inches long, 8–9 inches wide, 3–4 inches deep.
- Details: Lower rim height, extra ribs to prevent racking, lighter metal strap to cut weight.
Tool caddy trug
- Purpose: Hand tools, twine, ties, and a spray bottle.
- Dimensions: 18 inches long, 10 inches wide, 6 inches deep.
- Details: Add removable dividers fastened to ribs; reinforce the handle with a thicker lamination. Optionally, install a small magnet strip under the rim to capture stray screws or labels.
Mesh-bottom harvest trug
- Purpose: Quick rinse and drain for greens.
- Dimensions: 20 x 11 inches footprint.
- Details: Stainless mesh bottom with slatted sides and a cedar rim for low maintenance. Consider a slightly taller rim to reduce splash.
Riveted heritage look
- Purpose: Lean into the classic aesthetic.
- Details: Copper nails and rivets throughout, brass strap with hand-peened burrs, subtle oil finish.
For diagrams and alternate layouts, a plan set can speed drafting. Collections such as TedsWoodworking offer varied project blueprints that you can scale to your measurements, and My Shed Plans can help you create weatherproof storage so your trug dries properly between uses.
Step-by-step build walkthrough
Follow this sequence for a smooth, repeatable build.
- Make forms and templates
- Draw your base, rim, handle, and rib curves full-size on MDF.
- Cut clean edges, then seal with shellac or packing tape for glue release.
- Prepare wood stock
- Rip slats to 1-1/8 inches wide and plane to 1/8 inch; final width will be 1 inch after cleanup.
- Mill rim laminations to 1/8 x 1 inch; prepare extra pieces in case of breakage.
- Shape rib blanks to 1/2 x 1 inch; mark centerlines.
- Bend/laminate rim and handle
- Dry-fit laminations around the form, then glue and clamp with even pressure. Cure overnight.
- Steam-bend any single-piece components now and clamp to the form until dry.
- Shape the base and attach ribs
- Cut the base to shape and smooth edges.
- Glue and screw ribs to the base, keeping alignment true.
- Fit the rim
- Trim the laminated rim to length; bring ends together in a neat scarf joint or metal-strapped overlap.
- Secure the rim to rib tops with glue and temporary clamps.
- Mount the handle
- Fit tenons through the rim into the base or seat on rib tops. Glue and reinforce with screws or rivets.
- Install slats
- Start at the center; fasten slats to ribs using copper nails or stainless screws.
- Work outward, maintaining even gaps; trim slats to meet the rim neatly and fasten at the rim.
- Add the metal band
- Pre-drilled strap wraps the rim. Attach with rivets or screws with finishing washers every 3–4 inches.
- Tidy the overlap and burnish edges.
- Sand and finish
- Ease edges, sand to 220 grit, and apply your chosen finish.
- Final polish on metal with a fine abrasive pad.
Time estimate
- Two afternoons for prep and bending; one for assembly; one for finishing—with drying time in between.
If you want a business angle or production workflow for selling trugs at markets, a resource like WoodProfits discusses how to plan builds that sell and streamline costs without cutting corners on quality.
Troubleshooting and pro techniques
Even experienced woodworkers run into hiccups on curved projects. Here’s how to solve the common ones.
Cracked slats when bending
- Causes: Grain runout, too dry wood, bending too tight.
- Fixes: Reduce slat width, steam or soak longer, select straighter-grained stock, or switch to laminated slats for severe curves.
Rim spring-back
- Causes: Insufficient clamping or too few laminations.
- Fixes: Over-bend slightly on the form, add a third lamination, leave clamped longer, or use a higher-solids glue.
Fasteners pulling through thin slats
- Causes: Small bearing surface and overdriving screws.
- Fixes: Use finishing washers, step up fastener diameter slightly, pre-drill carefully, and reduce torque.
Metal strap kinks
- Causes: Tight inside curves, sparse pre-drilled holes.
- Fixes: Pre-bend strap gently around a larger form, then tighten to final radius; add more fastener points to distribute stress.
Racking or twist
- Causes: Uneven slat tension or misaligned ribs.
- Fixes: Loosen the last few slats and re-space; ensure the rim sits level; sight along the rim while tightening fasteners.
Finish blotching
- Causes: Uneven sanding or glue squeeze-out.
- Fixes: Raise the grain with a damp cloth and re-sand; scrape glue spots before finishing; use a washcoat if staining.
Safety reminders
- Steam and boiling water can scald—use heat-resistant gloves and eye protection.
- Deburr all metal edges; snagged clothing or cut fingers are preventable.
- Keep ventilation strong for oils and varnishes.
For more on PPE and safe practices, see Occupational Safety and Health Administration (osha.gov).
Recommended resources and next steps
When you build a tug basket from wood and metal garden once, you’ll want to tailor the next one to specific tasks—flowers, tomatoes, or tools. Consider these resources to deepen your skills and expand project possibilities:
- Plan libraries and build guides like TedsWoodworking for design inspiration and dimensioned drawings.
- Shop setup guides like UltimateSmallShop – The Next Woodworking Blockbuster! to optimize a compact workspace for bending forms and glue-ups.
- Side-hustle planning via WoodProfits if you’re considering selling trugs at local markets.
- Weatherproof storage planning through My Shed Plans to keep your tools and baskets in top condition.
Conclusion
A well-made trug-style carrier is a joy to use—and to build. By selecting the right hardwoods, combining them with corrosion-resistant metal, and following clear steps for bending, slatting, and fastening, you can confidently build a tug basket from wood and metal garden that serves for years. Start with a simple oval, refine your curves and finishing, then experiment with mesh bottoms, riveted accents, and custom sizes. When you’re ready to explore more plans or streamline your shop, resources like TedsWoodworking and UltimateSmallShop – The Next Woodworking Blockbuster! can help you keep improving project by project.
Frequently asked questions
What does “build a tug basket from wood and metal garden” mean?
It refers to building a garden trug—a shallow, oval carrier—using wood for the body and optional metal for reinforcement, ideal for harvesting and tool carrying.
What wood is best for a garden tug or trug?
Ash and white oak are top choices for strength and bending; cedar or cypress excel for bases due to natural rot resistance. Use straight, knot-free stock with consistent grain.
Do I need steam bending to make the rim and handle?
Not necessarily. Laminating thin strips around a form achieves smooth, strong curves with common glues. Steam bending is great for single-piece elegance if you have the setup.
Which metal should I use for the rim strap?
Galvanized steel is affordable and tough, brass offers a classic look and corrosion resistance, and copper rivets add heritage style. Stainless screws are excellent for structural fasteners.